# Configuration Instructions
> It is recommended to turn off the nscd and systemd-resolved processes in the background to avoid UDNS resolution failures.
When using the UDNS product, you need to change the default DNS of the UHost host to the following configuration.
```
100.90.90.90
100.90.90.100
```
The configuration of North China 1 is used as an example below to introduce how to modify DNS under different operating systems.
## CentOS (including CentOS6/7/8)
1. Modify /etc/resolv.conf:
```
sudo vim /etc/resolv.conf
```
Change it to the following content:
```
nameserver 100.90.90.90
nameserver 100.90.90.100
```
Save and exit, and it will take effect immediately.
2. Make it permanant. View the configuration file of the current network card /etc/sysconfig/network-scripts/ifcfg-eth0
```
sudo vim /etc/sysconfig/network-scripts/ifcfg-eth0
```
The content may be as follows:
```
BOOTPROTO=none
DEFROUTE=yes
DEVICE=eth0
DNS1=10.23.255.1
DNS2=10.23.255.2
DNS3=114.114.114.114
GATEWAY=172.16.0.33
HWADDR=52:54:00:ab:98:0b
IPADDR=172.16.0.45
MTU=1454
NETMASK=255.255.255.240
NM_CONTROLLED=no
ONBOOT=yes
STARTMODE=auto
TYPE=Ethernet
USERCTL=no
```
Modify the DNS-related configuration as follows:
```
DNS1=100.90.90.100
DNS2=100.90.90.90
```
Save and exit.
## Ubuntu (including 14.04/16.04/18.04)
1, Modify the current /etc/resolv.conf configuration file:
```
sudo vim /etc/resolv.conf
```
Change to:
```
nameserver 100.90.90.90
nameserver 100.90.90.100
```
The DNS configuration can take effect immediately.
2. Permanent. View the network card configuration file as follows:
### Non-cloud init startup management
```
sudo vim /etc/network/interfaces
```
Its content may be as follows:
```
auto lo
iface lo inet loopback
auto eth0
iface eth0 inet static
address 172.16.0.35
netmask 255.255.255.240
gateway 172.16.0.33
mtu 1454
dns-nameservers 10.23.255.1 10.23.255.2 114.114.114.114
```
Modify the dns-nameservers line to:
```
dns-nameservers 100.90.90.90 100.90.90.100 114.114.114.114
```
And save before exit.
### Use cloud init for startup management
```
sudo vim /etc/network/interfaces.d/50-cloud-init.cfg
```
Its content may be as follows:
```
auto lo
iface lo inet loopback
auto eth0
iface eth0 inet static
address 192.168.1.248/26
dns-nameservers 10.23.255.1 10.23.255.2 114.114.114.114
gateway 192.168.1.193
mtu 1454
```
Modify the dns-nameservers line to:
```
dns-nameservers 100.90.90.90 100.90.90.100 114.114.114.114
```
And save before exit.
## Windows (including 2008/2012/2016)
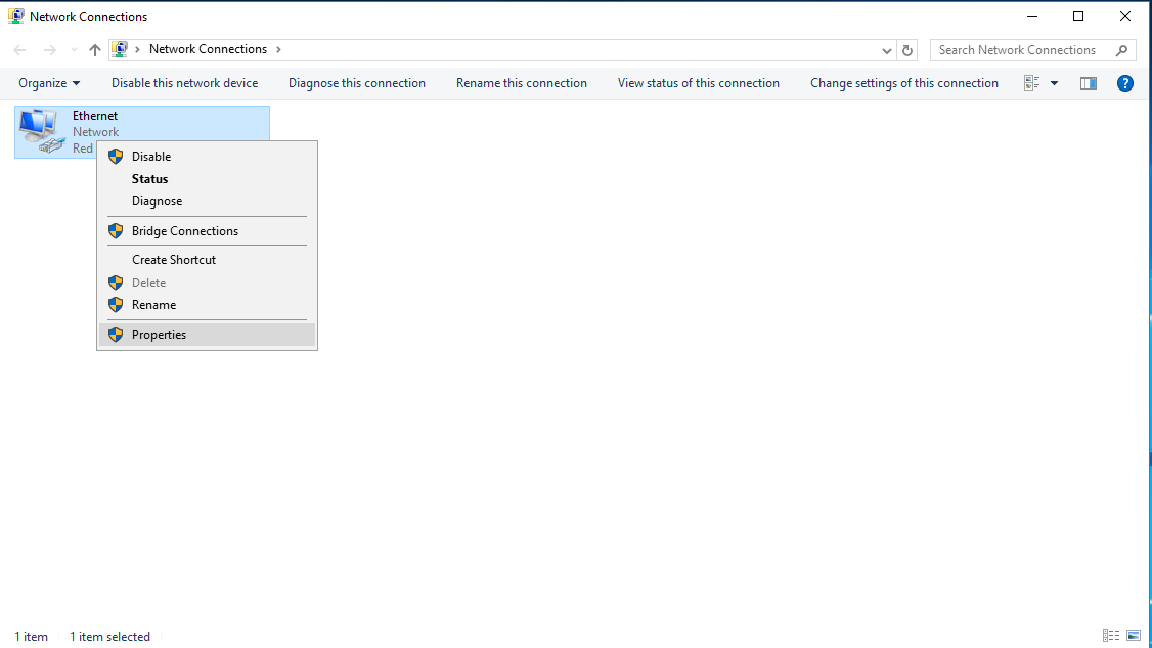
1. Right-click "start" and select "network connections".

2. Right-click "Ethernet" and select "Properties".
3. Select "Internet Protocol Version4(TCP/IPv4)", and modify Preferred DNS server and Alternate DNS server:
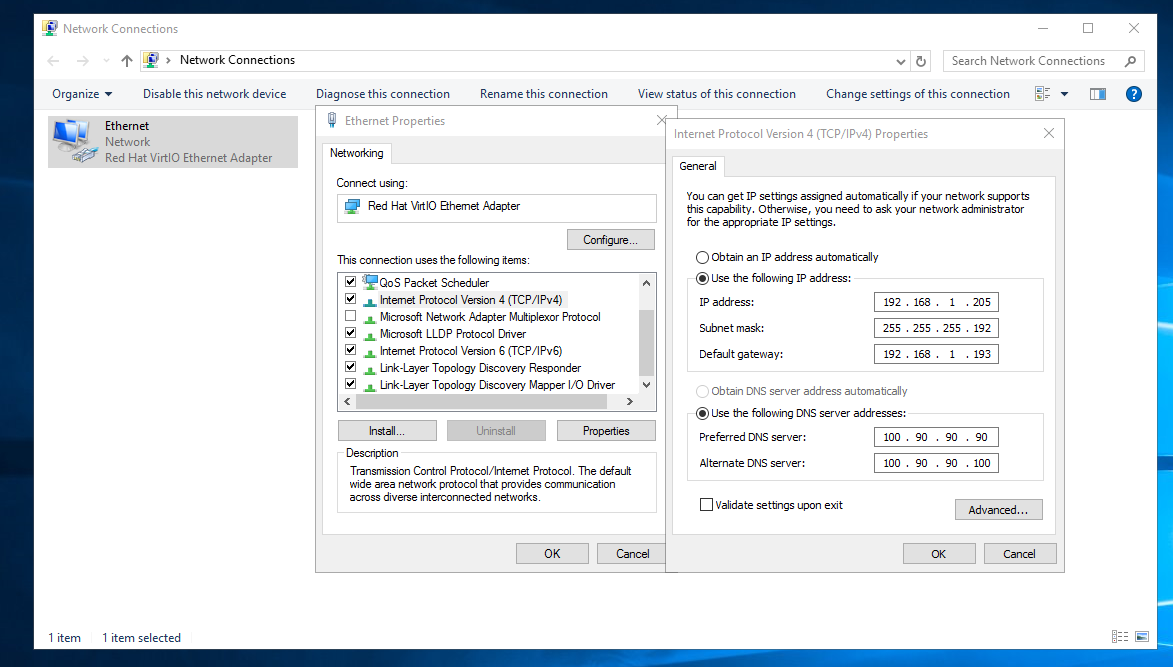
4. Click "OK" to make the modification successful.
## Debian (including 8/9/10)
1, Modify the current /etc/resolv.conf configuration file:
```
sudo vi /etc/resolv.conf
```
Change to:
```
nameserver 100.90.90.90
nameserver 100.90.90.100
```
The DNS configuration can take effect immediately.
2. Permanent. View the network card configuration file as follows:
### Non-cloud init startup management
```
sudo vi /etc/network/interfaces
```
Its content may be as follows:
```
auto lo
iface lo inet loopback
auto eth0
iface eth0 inet static
address 172.16.0.35
netmask 255.255.255.240
gateway 172.16.0.33
mtu 1454
dns-nameservers 10.23.255.1 10.23.255.2 114.114.114.114
```
Modify the dns-nameservers line to:
```
dns-nameservers 100.90.90.90 100.90.90.100 114.114.114.114
```
And save before exit.
### Use cloud init for startup management
```
sudo vi /etc/network/interfaces.d/50-cloud-init
```
Its content may be as follows:
```
auto lo
iface lo inet loopback
auto eth0
iface eth0 inet static
address 192.168.1.248/26
dns-nameservers 10.23.255.1 10.23.255.2 114.114.114.114
gateway 192.168.1.193
mtu 1454
```
Modify the dns-nameservers line to:
```
dns-nameservers 100.90.90.90 100.90.90.100 114.114.114.114
```
And save before exit.
## Redhat 6.X
1. Modify /etc/resolv.conf :
```
sudo vim /etc/resolv.conf
```
Change it to the following content:
```
nameserver 100.90.90.90
nameserver 100.90.90.100
```
Save before exit, and it will take effect immediately.
2. Make it permanent. Check the configuration file of the current network card /etc/sysconfig/network-scripts/ifcfg-eth0
```
sudo vim /etc/sysconfig/network-scripts/ifcfg-eth0
```
The content may be as follows:
```
BOOTPROTO=none
DEFROUTE=yes
DEVICE=eth0
DNS1=10.23.255.1
DNS2=10.23.255.2
DNS3=114.114.114.114
GATEWAY=172.16.0.33
HWADDR=52:54:00:ab:98:0b
IPADDR=172.16.0.45
MTU=1454
NETMASK=255.255.255.240
NM_CONTROLLED=no
ONBOOT=yes
STARTMODE=auto
TYPE=Ethernet
USERCTL=no
```
Modify the DNS-related configuration as follows:
```
DNS1=100.90.90.100
DNS2=100.90.90.90
```
Save and exit.